Afterwards, retry running the Inventory Control installation.
2. For most products, you will need to be an administrator on the local machine. This is especially true for InventoryControl and MobileAsset.
3. It is suggested that you turn off all firewall and anti-virus software prior to installing.
4. If you downloaded the installer, move the installer file out of the Downloads folder, then install again.
2. Supply at least a Company Name in Administration>Company Info, along with any other data you wish to record about your company (address, etc.) This information will be used in some of the report headers.
3. Refer to the built-in Help file's topic called "Import into Database" if you want to import inventory data from external sources. Steps 4 through 8 can be skipped if you intend to use the Import feature.
4. Set up at least one site and at least one location at that site. You can do this by clicking on the New button and then clicking on Location. Fill in the appropriate information and click OK.
5. Set up any suppliers that you may have. Again, click on the New button and select Supplier. Input appropriate information and click OK. (This step is optional.)
6. Set up any manufacturers that you have. Click on New, select Manufacturer, and input the information for each manufacturer. (This step is optional.)
7. Input customer information by selecting Customer from the New menu. Customers can be added at any time from the Mobile Inventory/Inventory Control program on the computer. (This step is optional.)
8. The last preparatory step is to input items. Click New and Item. If the item needs to be tracked by Serial Number, Lot Date Code or Pallet or you intend to require PO or Supplier Adds, or Customer name for Removes, it should be set up at this time. (At least one item must be created.)
9. After all items have been put into the item list by creating new items, then the inventory can be created. Click on the Inventory icon and more icons will appear at the bottom of the screen. Click the Add icon. Type or scan in the item number, specify a Location, the quantity, and any Tracked By or Required fields chosen for that item at the time the item was created. Click the Add icon. All Adds go into a pending transactions box. Once all inventory has been added, click on the Pending Transactions tab. If all transactions are acceptable, click Commit. If they are not, those that are unacceptable can be deleted and re-added. Once all transactions are correct, click Commit.
You can later Check-out, Move or Remove quantity for any Item that has been Added.
Refer to the built-in Help file's topic called "Import into Database" if you want to import inventory data from external sources.
We also have available training videos for this product:
Inventory Control Version 6 & 7 Training:
For an extended tutorial on how to use our Inventory Control program please watch this video, and if possible, follow along with your PC.
//www.g2hsk.com/inventory_control/tutorial/FINAL_IC6_tutorials.htm
//www.g2hsk.com/inventory_control/tutorial-ic7.htm
This video is designed to go over the majority of the program's features and give you an overall feel of how to use the program as well as its capabilities.
If you feel that you want more in depth training you can schedule a time with our training department for some extensive one-on-one learning. Please contact training@waspbarcode.com or call our Sales Department at 866-547-9277, option 2 for details on pricing for the one-on-one training sessions.
HKEY_LOCAL_MACHINE / SOFTWARE / MICROSOFT / MSSQLSERVER
HKEY_LOCAL_MACHINE / SOFTWARE / WASP TECHNOLOGIES
The user also needs read/write permission for the following folder:
C:\Program Files\Wasp Technologies
-----------------------------------------------
keywords: Mobile Asset Inventory Control
Tools > Options > Edit Field Names (YES) should be checked.
You can then double-click the item within the applicable section in our software for additional settings and to change the field name.
Note that this does not change the way we handle a value within the program.
To do so:
· On the main screen, go to Inventory
· Click on Add
· Select the item... the location you want to add items to
· At the bottom between help and cancel is Print Label check box, select that.
· Enter the number of labels you want to print out for this item
From the Print Options dialog, you can select the following print items:
Receipt: this option prints a receipt that describes the add transactions.
Labels: this option prints item labels for the items that are being added. The number of labels printed for a given item are determined by the No. of Labels field displayed in the Data tab. The file used to print this label is named AddTransactionItemLabel.lab and can be customized through the Labels feature.
Load Tickets: this option prints a label that includes the Date Added, Item Number, Item Description, and Quantity for a given add transaction. Load tickets are helpful for enforcing First In First Out (FIFO) removal of inventory from its storage location. By examining the Load Ticket placed on the inventory package, warehouse personnel are able to compare the Date Added value for stored inventory and select the oldest inventory package thereby complying to FIFO rules.
Click OK to submit the transaction(s) to your database.
On the computer with your InventoryControl database:
Click Start > Run. Type 'regedit' in the blank and click Ok. Expand out the following path:
64-bit Windows: HKEY_LOCAL_MACHINE > SOFTWARE > Wow6432Node > Wasp Technologies > Wasp License ManagerProducts
32-bit Windows: HKEY_LOCAL_MACHINE > SOFTWARE > Wasp Technologies > Wasp License ManagerProducts
Look for folders named ID70 and/or ID79. Check both of these for entries on the right that say "Client1" or "Client2" etc. The data for these keys will be the serial number in folder ID70 or activation code in ID79, followed by the client PC's machine name. Delete the Client keys for the machines that are no longer in use (but do not delete the Server key).
If you see multiple keys for the same client machine, check the license to see if there are spaces in it, e.g. "0879 107..." If that is the case, delete those keys from the server's registry, then go to the client machine, run regedit, and navigate to the following path:
64-bit Windows: HKEY_LOCAL_MACHINE\SOFTWARE\Wow6432Node\Wasp Technologies\InventoryControl\Options
32-bit Windows: HKEY_LOCAL_MACHINE\SOFTWARE\Wasp Technologies\InventoryControl\Options
Right click License and select Modify, then remove the spaces from the license number.
If the procedure above does not fix the issue, there may be some other mismatch occurring:
1. Make sure the registry path above matches exactly. Wasp's MobileAsset product has a similar but different path, with different values.
2. Make sure that the server and client PCs have the same license key (or have matching license and activation keys), as seen in the following registry path:
64-bit Windows: HKEY_LOCAL_MACHINE\SOFTWARE\Wow6432Node\Wasp Technologies\InventoryControl\Options\License
32-bit Windows: HKEY_LOCAL_MACHINE\SOFTWARE\Wasp Technologies\InventoryControl\Options\License
For example, if the server has a Standard key, but the clients are using a Professional key, client will continue to show the error message.
3. If the Server string value is missing under Wasp License ManagerProducts, the error message will continue to appear. To fix this, right-click, New, String Value. The name of the value should be Server and the data should be the activation or license key.
4. On the server PC, look in the following folder:
64-bit Windows: C:\Program Files (x86)\Wasp Technologies\InventoryControl\Services
32-bit Windows: C:\Program Files\Wasp Technologies\InventoryControl\Services
If there are files with extension/type RRA, this PC must be rebooted to complete the update or patch that was previously run.
After the reboot, look in this folder again. If the WaspInventoryWindowsService.exe file (type: Application) is missing, rerun the InventoryControl installer and do the repair option.
If the error message continues to appear, check again for mismatches in other sections of this article.
To resolve this issue:
- On the PC, check in Help > About for the version number.
If it is v6.0, please download and apply the current patch from http://dl.waspbarcode.com/wasp/InventoryControl_Patch_6x.exe.
If it is v7 please download and apply the current patch from http://dl.waspbarcode.com/wasp/InventoryControl_Patch_7x.exe. - Once you are on the current version, connect the device to the PC using the cable.
- Browse the files on the device using ActiveSync > Explore or Windows Mobile Device Center > File Management. Look in \Program Files\InventoryControlRF.
- Copy the file ServiceInfo.config to the PC. Use Notepad on the PC to edit the file. It will currently have 2 lines, the server name and the port number.
For example:
JASON-IC6
10005 - Insert 2 more lines at the top of the file, the first line being the IP address for the server machine, and the second duplicating the port number.
For example:
10.1.7.204
10005
JASON-IC6
10005 - After editing the file with your correct server name and IP address, copy it back to the device with ActiveSync/Windows Mobile Device Center, overwriting the file on the device.
- Try opening the program again and contact support if you still receive the same error.
If you have used the ImageStorage utility to add pictures to your Purchase Order or Pick Order print outs, download and extract this file on the server machine:
http://dl.waspbarcode.com/wasp/SupportFiles/ClearImageStorage.zip
There is a separate batch file for each of the 4 reports, ClearImage<report>.bat. Run the one for the report you need to clear the image from.
If the above is true, or if you have another reason to need to change the port number, run Change Configuration Settings.exe from this path:
64-bit Windows: C:\Program Files (x86)\Wasp Technologies\InventoryControl\Services
32-bit Windows: C:\Program Files\Wasp Technologies\InventoryControl\Services
There are two port numbers listed, License Manager Port at the top (default 10004), and the port number in Base Address at the bottom (default 10005). You may need to change one or both, depending on the conflict.
1. License Manager Port is the port used by the clients in a Pro version installation to validate the license key. If you change that number, you will also need to make a change to the registry entries on all client machines. On the client machines, go to Start > Run > regedit and navigate to HKEY_LOCAL_MACHINE\SOFTWARE\Wow6432Node\Wasp Technologies\InventoryControl\Options. Right click License Port and select Modify. Set the Base to Decimal and the value to match what you changed the port number to in the utility.
2. The port number in Base Address affects the RF mobile device communication. You will need to edit the ServiceInfo.config file on the mobile devices to put in the new Port number. See the following article:
InventoryControl: How to change the mobile device's RF/wireless port
http://support.waspbarcode.com/kb/articles/824
After changing your port number(s), the utility will attempt to restart the service, and will give a message indicating success or failure.
If you need to determine what ports are in use, and by which application, there is a utility you can download from Microsoft called SysInternals. After downloading that package, which is available from this link as of this writing, the piece of it you would use is TCPView. The Local Port column shows the port numbers we are interested in.
2. If that check box is not there, the database has not been properly updated with the web components.
Please download and extract http://dl.waspbarcode.com/wasp/SupportFiles/IC6InstallWeb.zip on the server machine, then run InstallWeb.bat to apply the scripts to the database. If you are running the Enterprise version of InventoryControl, you will need to edit InstallWeb.wql to supply the correct server\instance information and sa password before running the .bat file.
File5=CreateTableConstraints_Trial.sql
File6=CreateInventoryViews_Trial.sql
File7=CreateInventoryStoreProc_Trial.sql
File8=CreateInventoryTriggers_Trial.sql
File9=Install_ENGLISH_Inserts_Trial.sql
File10=CreateWaspAccounts_Trial.sql
File11=InventoryTrialData.sql
** If you get errors during this script saying Invalid column name 'inventoried' or 'inventoried_2', these 2 errors are ok.
These scripts are for the initial release version 6.0.
Download and extract this file on the database server machine:
http://dl.waspbarcode.com/wasp/SupportFiles/InventoryControlV63Blank.zip
If you have the Standard or Pro version of InventoryControl, or if you have Enterprise but allowed the installer to install SQL Server 2005 Express, run Restore.bat.
If you have Enterprise, you can restore InventoryControl631Blank.bak in SQL Server Management Studio, but after restoring it you will need to also run FixInventoryUser.sql.
For Mobile Asset:
C:\Documents and Settings\jason\Local Settings\Application Data\Wasp Barcode Technologies\MobileAsset\5.0.0.0 (XP)
C:\Users\<username>\AppData\Local\Wasp Barcode Technologies\MobileAsset\5.0.0.0 (Vista/7)
For InventoryControl:
C:\Documents and Settings\All Users\Application Data\Wasp Barcode Technologies\InventoryControl\4.0.0.0 (XP)
C:\Users\All Users\Wasp Barcode Technologies\InventoryControl\4.0.0.0 (Vista/7)
C:\ProgramData\Wasp Barcode Technologies\InventoryControl\4.0.0.0 (Vista/7 alternate path)
You could also use the WaspSupportUtility from http://dl.waspbarcode.com/wasp/WaspSupportUtility.exe to access the log files.
Within the LabelerOCX.log file, if you see the following error:
OpenLabFileWithParam Return Value -76 NOOOOO, OpenLabFileWithParam FAILURE
it usually means there is an issue with the user rights. If you are running Windows Vista or 7, you can test for this by right clicking InventoryControl\MobileAsset and selecting Run As Admin, then attempt to print the labels again. If they print without error when running as admin, it is for sure a rights issue.
To grant the correct rights to all users, please download and extract the appropriate file from these links, then run the SetReadOK_##.bat file:
For 32 bit versions of Windows: http://dl.waspbarcode.com/wasp/SupportFiles/SetReadOK_32.zip
For 64 bit versions of Windows: http://dl.waspbarcode.com/wasp/SupportFiles/SetReadOK_64.zip
If you continue receiving the error after running the above, you may also need to browse to C:\ProgramData, then right click Wasp Barcode Technologies and go to Properties, then Security. Click the Edit button, then click Add. In the Enter the object names box, type Everyone, then click Check Names and it should underline Everyone. Click OK. Now check the Allow box for Full Control and click Apply and OK.
With Auto Profile enabled, the SCU selects the profile to use automatically. When the Summit radio makes its first attempt to associate to an access point (after startup or resume), SCU tries each profile in order until the radio associates to an access point. The successful profile becomes active and remains active until the device is suspended and resumed, power-cycled, or restarted, causing the automatic profile selection process to restart, OR, you disable Automatic Profile and manually select a different profile on the SCU main window.
There is a limit of 19 profiles in the Auto Profile list.
If you need to remove an image you have loaded using this utility, please refer to this article:
InventoryControl v7 - I need to clear pictures I added to the reports using the ImageStorage utility
http://support.waspbarcode.com/kb/articles/571
B. Configure the Client PC:
Connect label printer via USB. Configure the label size on the General (Preferences) and Advanced (Printing Defaults) tabs of Printer Properties. Share it as a network printer. Click the Additional Drivers button, check boxes for x64 and x86, OK, click "Install this driver software anyway", Close. Note the PC name and shared printer name for later.
C. Configure the PC running WIWS:
1. Add the service account into the local Administrators group (or some other group with admin rights).
2. Log onto the PC as the service account.
3. Install the networked label printer. Set the label size (in both places) the same as on the Client PC.
4. Set the WIWS to log on as the service account:
Control Panel > Administrative Tools > Services.
Right-click on Wasp Inventory Windows Service and select Properties.
On the Properties screen, select the Log On tab.
Select the "This account" checkbox and then the Browse button.
Enter the service account, then click the Check Names button.
Click OK.
A confirmation message similar to the following will appear:
"The account .\<account name> has been granted the Log On As A Service right."
Click OK on this message.
A message similar to the following will appear:
"The new logon name will not take effect until you stop and restart the service."
Click OK again to close out of the screen.
On the Services screen, right-click Wasp Inventory Windows Service and select Stop, then right-click again and select Start.
5. Log off the service account.
D. Configure the mobile device:
Connect the mobile device to the PC, and set it up normally in Mobility, Windows Mobile/CE (Wireless). During setup, for the question "Do you plan to print from the mobile device?", click Yes, then click "Yes, I will be printing from a network printer".
On the mobile device, run InventoryControlRF and log in. At the bottom (or top), click Tools button (or menu), Select Label Printer. Select the networked label printer. This typically appears toward the bottom of the list, in the form \\clientpcname\printername. Then tap OK.
E. Edit the label (optional).
If the WIWS PC has the InventoryControl software installed, edit the label on that PC. Otherwise use any other InventoryControl client PC, and don't forget to do *** when you get to it below.
In InventoryControl, Labels, edit "Add, Receive Item Label for Mobile Device", which opens in Labeler. Match the label size and layout if needed. Save the changes. In Windows File Explorer, find this path/filename:
C:\ProgramData\Wasp Barcode Technologies\InventoryControl\4.0.0.0\Labels\MobileDeviceAddTransactionItemLabelDB.LABX
Move or copy this file to the following path:
C:\ProgramData\Wasp Barcode Technologies\WaspInventoryWindowsService\6.0.0.0\Labels\
If there's an existing file by the same name there, you can rename it first, or overwrite it, as desired.
*** If you're editing on a client PC, you must copy the file to the same path on the WIWS PC (via network, thumb drive, or other method).
F. Print labels:
On the mobile device, when Adding or Receiving items, there will be a line at the bottom that says "No. of Label:" where you specify how many labels to print. When the transaction is complete, that number of labels should print from the specified label printer. Note: There may be a delay of several seconds before the label(s) print out.
Right-click the Wasp Inventory Windows Service, select Properties, select the Log On tab: With Local System account selected, the checkbox "Allow service to interact with desktop" should be unchecked. Click OK.
Right-click the service, Start.
Resolution 2:
In Windows Firewall, you'll need to make program (Add Program...) exceptions for the following:
C:\Program Files\Wasp Technologies\InventoryControl\ InventoryControl.exe
C:\Program Files\Wasp Technologies\InventoryControl\Services\WaspInventoryWindowsService.exe
C:\Program Files\Microsoft SQL Server\90\Shared\sqlbrowser.exe
C:\Program Files\Microsoft SQL Server\MSSQL$WASPDB\Binn\sqlservr.exe
Windows Firewall will also need to (Add Port...) 10004 & 10005.
Downloads:
Windows 8 firewall exceptions for InventoryControl:
http://dl.waspbarcode.com/wasp/supportfiles/kbimages/ic7/windows-8-firewall-exceptions-for-inventorycontrol.pdf
Windows 7 firewall exceptions for InventoryControl:
http://dl.waspbarcode.com/wasp/supportfiles/kbimages/ic7/windows-7-firewall-exceptions-for-inventorycontrol.pdf
Windows XP firewall exceptions for InventoryControl:
http://dl.waspbarcode.com/wasp/supportfiles/kbimages/ic7/windows-xp-firewall-exceptions-for-inventorycontrol.pdf
Windows XP
- Right-click on the Windows Desktop.
- Select Properties to open the Display Properties window.
- Click the Settings tab.
- Click the Advanced Button.
- Click the General tab.
- Select Normal size (96 Dpi) from the DPI Setting: dropdown list.
- Click OK.

Applies to InventoryControl, MobileAsset, WaspTime
Symptom
When you attempt to run a report, you receive a prompt:
Database Login
Server Name: <server>
Database: <blank>
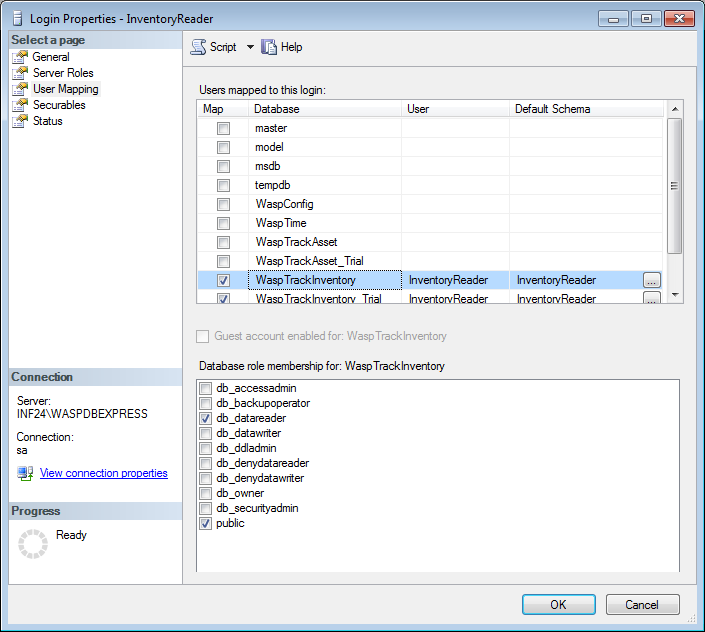
Login ID: WaspReader
Password: ********
Clicking the Finish button gives a Login Failed message.
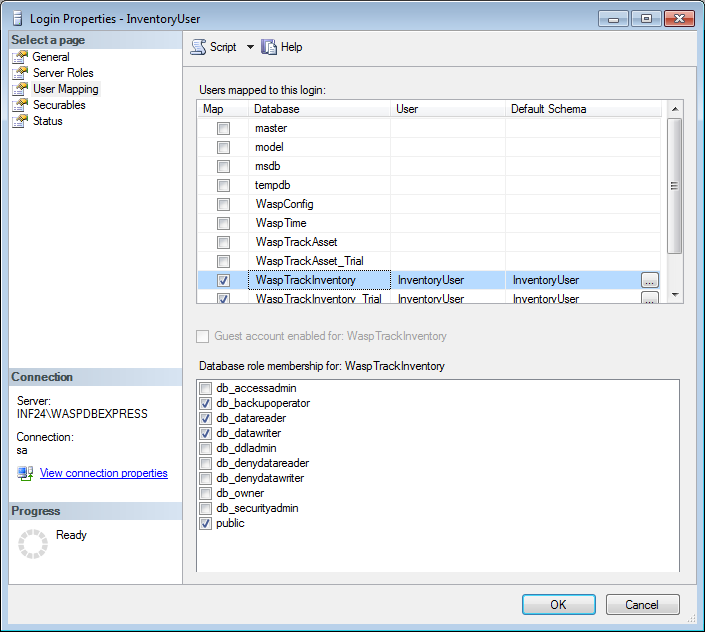
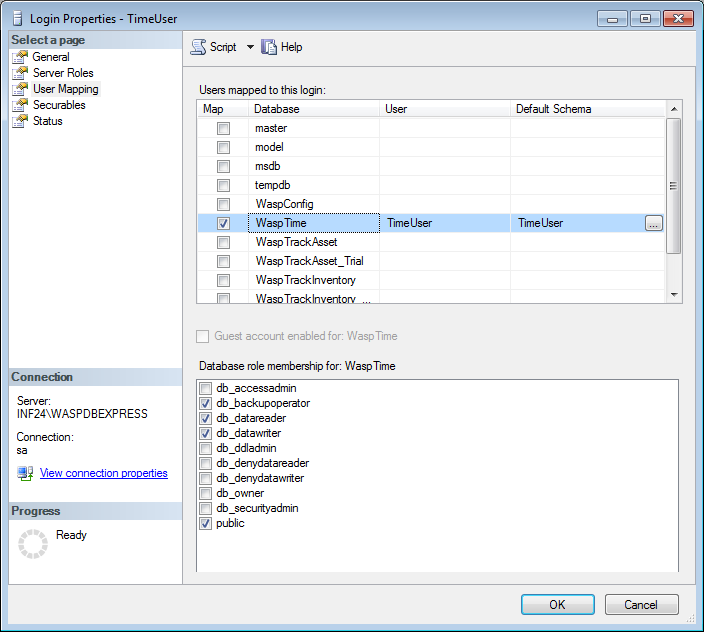
Note: The Login ID might be different, such as TimeUser or AssetReader.
Possible Cause 1
The SQL Native Client is not installed or corrupted.
Solution 1
In Programs and Features, if "Microsoft SQL Server Native Client" is listed, right-click and uninstall it.
Rerun the SQL Native Client installer from the installation disc. Alternately, the installer can be downloaded here:
64-bit Windows: http://dl.waspbarcode.com/wasp/supportfiles/sqlncli_x64.zip
32-bit Windows: http://dl.waspbarcode.com/wasp/supportfiles/sqlncli.zip
Possible Cause 2
TLS 1.0 has been disabled on the database PC and/or the workstation running the report.
Solution 2
On any affected PC, follow the resolution in the article "Multiple Products: SQL Server service will not start, error code -2146893007" which is linked below in Related Pages.
Setting Permissions in Windows XP:
- In Windows File Explorer, open the C:\Program Files folder so you can see the Wasp Technologies folder.
- Right click the Wasp Technologies folder, then click Properties.
- Click the Security tab.
- In the top section, click the Users group.
- In the bottom section, the Full Control row, check the box in the Allow column.
- Click OK.
This article applies to Inventory Control v6 & v7, and MobileAsset v6 & v7. Note: MobileAsset v7's default setting is 0 (show all).
The default number of objects (e.g. items or assets) shown in lists is 1000. You can filter your list to show the desired objects, or you can set a larger number of objects to show at once (or show all). If you choose to show all, you may experience performance degradation with several thousand objects, with older/slower server hardware.
Inventory Control v6 & v7: In the main window: Tools menu, Options. In the Support section (about halfway down), click Max Row Count.
MobileAsset v6 & v7: Administration (on left), Options (on right). In the Support section, click Max Row Count.
Both programs: "This is the maximum number of rows that will be displayed on most grids. Set this number to 0 to see all rows. The maximum can not be less than 100."
Change to your desired setting, then click OK.
This setting applies to the entire database, for all PCs and users.
There is a two part solution to correct this issue:
Step One:
- In InventoryControl, go to Tools > Options and disable the Automatic Customer Number option.
- Go to Lists > Customer. The Customer List will appear.
- On the Customer List locate the customer numbers higher than the range you want to use and edit them to give them a lower customer number.
Step Two:
- On the database server machine, download http://dl.waspbarcode.com/wasp/supportfiles/ResetAutomaticCustomerNumberIC.zip and extract it, then run Update.bat.*
- In InventoryControl, go back to Tools > Options and re-enable Automatic Customer Number.
Note: If this script does not work as expected, there are probably deleted objects retained by the database that are disrupting the calculation. Contact Wasp Support for assistance with resolving this.
------------
*Enterprise users will need to edit ResetAutomaticCustomerNumber.wql to supply the correct server\instance name and the password if InventoryUser has been set to use something other than the default.
This same file will work for both v6 and v7.
Additional Information:
X
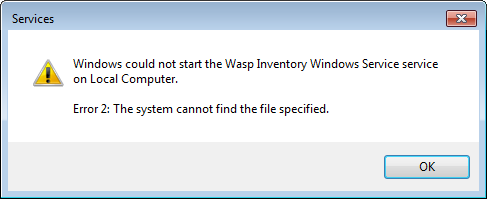
Cause
- The WIWS executable file is missing.
or - The registry setting for the path to the WIWS executable file is wrong.
- Determine whether the WIWS executable file is present. Look in the path to the service (if you changed this during installation, use yours instead):
64-bit Windows: C:\Program Files (x86)\Wasp Technologies\InventoryControl\Services
32-bit Windows: C:\Program Files\Wasp Technologies\InventoryControl\Services
Note: Make sure you're looking for the correct file (the Application). When Windows is set to show file extensions, files of type Application end with ".exe":
However, when Windows is not set to show file extensions, the Application file has no extension, while the WIWS Configuration File ends with ".exe":
If the Application file is not there, it has gotten deleted somehow. We have seen antivirus programs cause this problem, so disable your antivirus program first. Then rerun the InventoryControl installer, making sure to check the Database box in the component choice screen. Follow up with any needed patch. - If the Application/executable file is present as described above, check the path that Windows thinks the service should point to. Open the Windows Services window (Start, Run, services.msc). Find Wasp Inventory Windows Service and double-click it to see Properties. The "Path to executable:" line should exactly match the path mentioned above (including spaces and punctuation). If not, Windows can't find it.
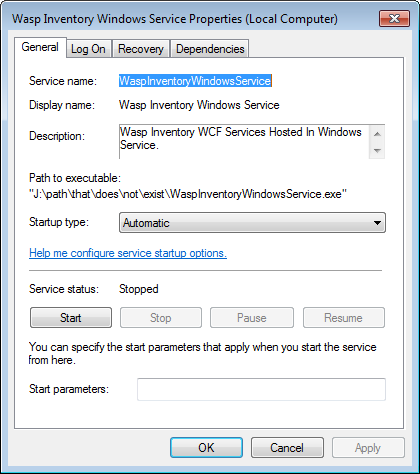
To change the path, edit it in Registry Editor (Start, Run, regedit). Navigate to HKEY_LOCAL_MACHINE\SYSTEM\CurrentControlSet\Services\WaspInventoryWindowsService: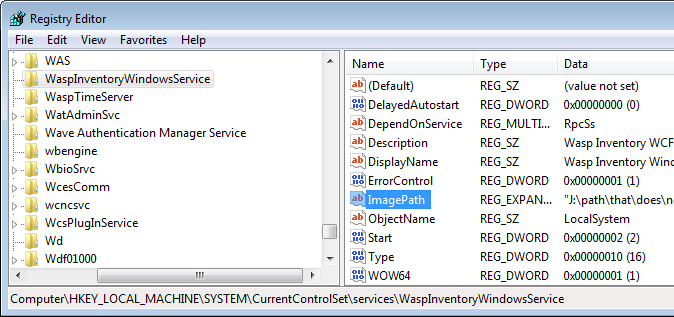
Double-click ImagePath to change the value. Be sure to include double quotes at the beginning and end, and include the executable filename. Correct settings for the default path follow (copy & paste for accuracy):
64-bit Windows:
"C:\Program Files (x86)\Wasp Technologies\InventoryControl\Services\WaspInventoryWindowsService.exe"
32-bit Windows:
"C:\Program Files\Wasp Technologies\InventoryControl\Services\WaspInventoryWindowsService.exe"
Click OK to accept the change.
In the Windows Services list, start the Wasp Inventory Windows Service.


Related Information
http://support.waspbarcode.com/kb/articles/823
The other four fields, Serial Number, Pallet, Lot, and Date Code, are all permanently tracked with the inventory record. If you need the system to track additional information for each inventory piece, you will need to make use of one of those fields. You can rename the fields as needed, but they retain the original properties. I.e., even if you rename it, Serial Number will always require a unique value.
These TrackBy fields can only be used if they are checked on the New or Edit Item screen. If you need to begin tracking one of these fields for an existing item, you will first need to remove any active quantity for that item, enable the field you wish to use, then re-add the quantity with the required field filled in.

Causes: Select Site has been configured in a way that is hiding all or some of your locations. Alternately, the user you are logged in as belongs to a group that does not have access to all of your sites.
Resolution: From the main screen of the program, go to Tools > Select Site. If there are sites selected for either Source or Destination, that will limit the locations shown in other parts of the program to only those locations in the selected site(s). Set them both to <all> to allow all locations to be visible.
If Select Site is already set to <all>, go to Administration > Security and verify that the Group containing the affected user has check marks in front of the sites you wish that user to be able to access.
Resolution
- Log onto the PC as a Windows administrator to install the software.
or - Right-click the installer and choose Run As Administrator. Note: This may not always work.